Pages

Saturday, September 28, 2013

Send Email

In this post, you learn to create an e-mail sender app to send e-mail message and attached file from your Android smart phone to an e-mail address. Now open your Eclipse and create a new project call emailsender. For this app, we have the simple interface as shown in the screen shot below.

e-mail sender main interface


Views or components for this user interface are three EditText. One EditText allows the user to input the recipient e-mail address; One is to input the subject and another one is for inputting the message. The content of the main_layout.xml that is the resource of the user interface is shown below:

main_layout.xml file

<?xml version="1.0" encoding="utf-8"?>

<LinearLayout xmlns:android="http://schemas.android.com/apk/res/android"
    xmlns:tools="http://schemas.android.com/tools"
    android:layout_width="match_parent"
    android:layout_height="match_parent"
    android:orientation="vertical"
    android:paddingBottom="@dimen/activity_vertical_margin"
    android:paddingLeft="@dimen/activity_horizontal_margin"
    android:paddingRight="@dimen/activity_horizontal_margin"
    android:paddingTop="@dimen/activity_vertical_margin"
    tools:context=".MainActivity" >

    <EditText
        android:id="@+id/mail_address"
        android:layout_width="fill_parent"
        android:layout_height="wrap_content"
        android:hint="@string/mail_address" />  

    <EditText
        android:id="@+id/mail_subject"
        android:layout_width="fill_parent"
        android:layout_height="wrap_content"
        android:hint="@string/mail_subject" />
 

    <EditText
        android:id="@+id/mail_text"
        android:layout_width="fill_parent"
        android:layout_height="200sp"
        android:hint="@string/mail_text"
        android:gravity="top"
        />

</LinearLayout>


The send and attach icons are placed on the action bar (see the picture above). By clicking the send icon on the action bar, a list of mail clients installed on your system is displayed to receive your message to send it to the recipient. The attach icon allows the user to attach a file to be sent along the e-mail message.
To setup action bar for the e-mail sender app, the SherlockActionBar library is used. If you don't know how to add this project library to your project, please read this TextViewer post.
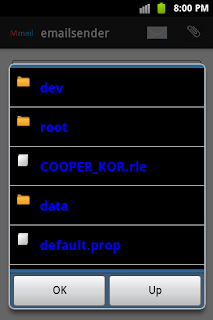
When the user selects the attach icon from the action bar, a file chooser dialog shows up so that the user can choose any file that he/she wants to attach to the e-mail message. The FileChooser class that created in the previous post (FileChooser) is integrated with the e-mail sender app to show the file chooser dialog. The steps below tell you how to integrate the FileChooser with this app.

1. Copy the selection_style.xml, fileicon.png, and diricon.png files to the res/drawable directory
2. Copy the listlayout.xml file to the res/layout directory
3. Copy the AndFileChooser.java and ListAdapterModel.java files to the src directory and rename the package to match the package name of the e-mail sender app.
4. In the res/menu directory, replace the auto-generated main.xml file with the main.xml file from the FileChooser app.

e-mail sender showing file chooser


The AndroidManifest.xml file is modified to apply icon (mmail) and use the Shecklock sheme in the e-mail sender app. The content of this file is written as shown below.

AndroidManifest.xml file

<?xml version="1.0" encoding="utf-8"?>
<manifest xmlns:android="http://schemas.android.com/apk/res/android"
    package="com.example.emailsender"
    android:versionCode="1"
    android:versionName="1.0" >

    <uses-sdk
        android:minSdkVersion="8"
        android:targetSdkVersion="17" />

    <application
        android:allowBackup="true"
        android:icon="@drawable/mmail"
        android:label="@string/app_name"
        android:theme="@style/Theme.Sherlock.Light.DarkActionBar">
        <activity android:configChanges="orientation"
            android:name="com.example.emailsender.MainActivity"
            android:label="@string/app_name" >
            <intent-filter>
                <action android:name="android.intent.action.MAIN" />

                <category android:name="android.intent.category.LAUNCHER" />
            </intent-filter>
        </activity>
    </application>

</manifest>


Now, we take a look at the MainActivity.java file. In this file, code are written to display file chooser dialog and receive the selected file path, and to send the e-mail message.

MainActivity.java file

package com.example.emailsender;

import java.util.List;
import com.actionbarsherlock.app.SherlockActivity;
import com.actionbarsherlock.view.MenuItem;
import android.net.Uri;
import android.os.Bundle;
import android.content.Intent;
import android.content.pm.PackageManager;
import android.content.pm.ResolveInfo;
import android.widget.EditText;

public class MainActivity extends SherlockActivity {

AndFileChooser filechooser;
protected void onCreate(Bundle savedInstanceState) {
        super.onCreate(savedInstanceState);
        setContentView(R.layout.main_layout);
       
    }

@Override
    public boolean onCreateOptionsMenu(com.actionbarsherlock.view.Menu menu) {
        getSupportMenuInflater().inflate(R.menu.main, menu);
        return super.onCreateOptionsMenu(menu);
    }

   
    protected void onStart(){
    super.onStart();
    filechooser=new AndFileChooser("/",this); //create file chooser dialog
    }
   
    public void sendmail(){
    //get the selected file path
    String att_path=filechooser.getFilePath();
    //get address, subject, and message input by the user
    EditText txto=(EditText) findViewById(R.id.mail_address);
    EditText txtsubject=(EditText) findViewById(R.id.mail_subject);
    EditText txtmessage=(EditText) findViewById(R.id.mail_text);
    //create a Uri object to for the selected file path
    Uri urlpath=Uri.parse("file://"+att_path);
    //create an intent object for sending action
    Intent intent=new Intent(Intent.ACTION_SEND);
    //specify the minetype of the e-mail message
    intent.setType("*/*");    
    //put the recipient e-mail address in the intent object
    intent.putExtra(Intent.EXTRA_EMAIL,txto.getText().toString());
    //put the subject in the intent object
    intent.putExtra(Intent.EXTRA_SUBJECT,txtsubject.getText().toString());
    //put the message in the intent object
    intent.putExtra(Intent.EXTRA_TEXT,txtmessage.getText().toString());
    //put attached file in the intent object
    intent.putExtra(Intent.EXTRA_STREAM,urlpath);
    //Find available apps to receive the intent and start the intent if find one
    PackageManager pm=getPackageManager();
    List<ResolveInfo> vapps=pm.queryIntentActivities(intent, 0);
    if(vapps.size()>0){
    startActivity(Intent.createChooser(intent,"Send mail"));
    }
       
    }
   
    public void browse(){
   
    filechooser.show(); //show the file chooser dialog
   
   
    }
 
    public boolean onOptionsItemSelected(MenuItem item) {
        super.onOptionsItemSelected(item);
        switch(item.getItemId()){
       
            case R.id.send: //send item is selected
            sendmail();
                break;

            case R.id.attach: //attach item is selected
            browse();
                break;

        }
       return true;
    }


}


In the onStart method, a AndFileChooser object is created by the following line of code.

filechooser=new AndFileChooser("/",this); //create file chooser dialog

To handle which item of the action bar is selected, you need to override the onOptionsItemSelected method. The switch... case statement is used to determine the selected item. The browse method is called to show the file chooser dialog when the selected item is the attach item. Otherwise, the sendmail method is called to send the e-mail message to the e-mail client.
In th sendmail method, the getPath method of the AndFileChooser object is used to get the path of the selected file. The e-mail data such as recipient e-mail address, subject, message, and attached file are collected and placed in the intent object to be sent to the mail client. You need to specify ACTION_SEND to the intent for e-mail sending. The PackageManager class to read the mail clients installed on the system and show a list of the available mail client apps. The startActivity method is called to start sending the e-mail message.
Now you are ready to run the e-mail sender app on your emulator. The apk file of this app is also provided through the link below so you can download and install it on your real device.

Download the apk file of the e-mail sender app

Tuesday, September 24, 2013

File Chooser

In this post, you learn to implement a File Chooser in Android. Some apps such as text viewer, text editor, and other apps that allow the user to select a file from the Android to open should provide a dialog that the user can select the file easily. In Java, we have JFileChooser and in VB.NET or C# we have OpenFileDialog. However, in Android, i have not found a file chooser library to do such the same thing.
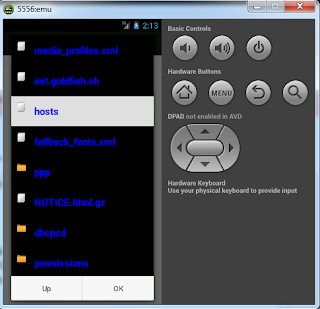
To begin, please open the Eclipse and create a new Android project called FileChooser. In this File Chooser implementation, i use the AlertDialog class to show a file chooser dialog. On the dialog, there are one ListView, and two Buttons. The ListView displays the files and directories. The first Button takes the user back up one level of the directories structure. The second Button is pushed to close the dialog.


FileChooser for Android


You no need to create a layout file for the dialog to show the ListView, and the two Buttons as these components will be added to the dialog by code in AndFileChooser.java file.
Each item of the ListView contains both icon and text. If the item represents the directory, the icon will be directory icon. Otherwise, it is the file icon. In default, the ListView provided by Android is simple ListView that its items show only text. To customize the ListView to display both icon and text, first to do is changing the layout file that is applied to each item of the ListView. The layout file in this File Chooser implementation is called listlayout.xml in layout directory. Its content is shown below.

<?xml version="1.0" encoding="utf-8"?>
<LinearLayout xmlns:android="http://schemas.android.com/apk/res/android"
    android:layout_width="fill_parent"
    android:layout_height="wrap_content"
    android:orientation="horizontal"
    android:padding="5dip"
    >


<ImageView
    android:id="@+id/icon"
    android:layout_width="30dp"
    android:layout_height="30dp"
    android:padding="5sp"
    android:contentDescription="iconimage"
 />

<TextView
    android:id="@+id/label"
        android:layout_width="wrap_content"
        android:layout_height="wrap_content"
        android:padding="10sp"
        android:textSize="20sp"
        android:textColor="#0000ff"
        android:textStyle="bold" >
</TextView>
</LinearLayout>


As you see in the listlayout.xml file, there are two components in this layout. First one is the ImageView to display the icon of an item. The second component is TextView to display the text of the item.
You should note that this layout is not the layout of the ListView itselft. Instead, it is the layout of an item of the ListView. The ListView will be defined in code (int AndFileChooser.java).

Another layout file that you need to create is called selection_style.xml. This layout is applied to the selected item of the list. The selection_style.xml file is stored in the drawable directory. In this directory, you also need two small images--directory and file images. These images represent the directory and file icons that show on the ListView (see the picture above).

<?xml version="1.0" encoding="utf-8"?>
<selector xmlns:android="http://schemas.android.com/apk/res/android">
 
    <item>
        <shape>
            <gradient
                android:startColor="#dfdfdf"
                android:endColor="#dfdfdf"            
                android:angle="180" />
        </shape>      
    </item>
</selector>

Now take a look at the AndFileChooser. java file. This file contains a class called AndFileChooser. The AndroidFileChooser class can be used anywhere in your app to display the file chooser dialog.

AndFileChooser.java

package com.example.filechooser;
import java.io.File;
import android.app.AlertDialog;
import android.app.Dialog;
import android.content.Context;
import android.content.DialogInterface;
import android.graphics.Color;
import android.view.View;
import android.view.ViewGroup;
import android.widget.AdapterView;
import android.widget.AdapterView.OnItemClickListener;
import android.widget.ListView;
import android.widget.TextView;
import android.widget.Toast;

public class AndFileChooser {
private int RESULT=0;
private static final int RESULT_OK=1;
private String path;
private Context context;
private  String att_path;
private ListView l;

AndFileChooser(String path, Context context){
this.path=path;
this.context=context;
}

public void show(){
//create a dialog to show a list of files and directories
AlertDialog.Builder builder = new AlertDialog.Builder(context);
builder.setCancelable(true);
builder.setPositiveButton("OK", new OkOnClickListener());
builder.setNeutralButton("Up",null);
builder.setView(getList(path));
AlertDialog dialog = builder.create();      
dialog.show();
//override the default dialog default behavior when the Up button is pressed
dialog.getButton(Dialog.BUTTON_NEUTRAL).setOnClickListener(new View.OnClickListener() {

public void onClick(View arg0) {
upOneLevel();
}
});
}

private void upOneLevel(){
    //go back on directory
    path=path.substring(0, path.lastIndexOf("/"));
if(path.length()<=0)
path="/";
listFiles();
   }
   private final class OkOnClickListener implements DialogInterface.OnClickListener {
    public void onClick(DialogInterface dialog, int which) {
    RESULT=RESULT_OK;
    dialog.cancel();//close the dialog    
    }
   }
 
   private ListView getList(String path){  
    l=new ListView(context); //create new list object
    l.setBackgroundColor(Color.BLACK); //apply background to the ListView
    listFiles(); //add files and directories to the list for the first time
    l.setOnItemClickListener(new ItemList()); //register item click event
    return l;
   }  
 
 
   public void listFiles(){
   
    try{
    File f=new File(path);    
    if(f.isDirectory()){ //Check whether the path is a directory
    String[] contents=f.list();
    if(contents.length>0){ //list contents of the directory
    //ArrayAdapter<String> aa=new ArrayAdapter<String>(context,R.layout.listlayout,contents);
    ListAdapterModel aa=new ListAdapterModel(context,R.layout.listlayout,R.id.label,contents,path);
    l.setAdapter(aa);
    }
    else
    path=f.getParent(); //keep its parent directory for empty sub-directory
    //Toast.makeText(context,att_path, Toast.LENGTH_SHORT).show();
    }
    else if(f.isFile()){ //Otherwise, get the full path of the file and keep parent directories of the file.
    //This file will be attached to the email message
    att_path=f.getPath();
    //path=att_path.substring(0, att_path.lastIndexOf("/"));
    path=f.getParent();
    Toast.makeText(context,att_path, Toast.LENGTH_SHORT).show();
    }
    }catch(Exception e){e.printStackTrace();}  
   }
 
   private class ItemList implements OnItemClickListener{
   
    public void onItemClick(AdapterView<?> parent, View view, int position, long id) {
     
    l.setSelector(R.drawable.selection_style); //apply background style to the selected item
    ViewGroup vg=(ViewGroup)view;
      String selectedItem = ((TextView) vg.findViewById(R.id.label)).getText().toString();
    path=path+"/"+selectedItem; //append the item to path
           listFiles();  //update files and directories of the list when a file or directory
       
      }
   }
 
   public String getFilePath(){
    if(RESULT==RESULT_OK)
    return att_path;
    else return null;
   }
}


The AndFileChooser class has the show method to display the file chooser dialog. In the show method, the Builder class that is a sub-class of the AlertDialog is used to create a dialog. To add an OK button to the dialog, you can use the setPositiveButton method of the Builder class. You will need to specify the text to display on the button (OK), and the click listener to this method. The OkOnClickListener class defines the click listener for the OK button.

private final class OkOnClickListener implements DialogInterface.OnClickListener {
    public void onClick(DialogInterface dialog, int which) {
       RESULT=RESULT_OK; //set the RESULT to RESULT_OK
       dialog.cancel();//close the dialog
     }
}


The click listener registers the OK button with the click event and performs action when the button is clicked. We also need one more button (Up) to take the user back up one level of the directories structure. The setNeutralButton is called to define this button. In Android, the dialog closes immediately when the user clicks any button on the dialog. However in the File Chooser app, when the user clicks the Up button, the dialog must not close. Instead, it takes the user back up one level. To do what we want, we need to change this default behavior by setting null to its click listener when it is defined and later overriding its setOnClickListener method.

To display the ListView on the dialog, you need to use the setView method of the Builder. In this app, our ListView object is defined in the getList(String path) method. This method returns a ListView object with items. Its items are files and directories of the parent directory specified by the path argument. In the getList method, the listFiles method is called to retrieve the contents (files and directories) of the input path and show them on the list. When the user selects an directory item of the ListView, the contents of the directory will be listed (overriding the previous contents of the ListView). To perform this action, you need to register the ListView with the item click listener by using the setOnItemClickListener method. The ItemList class defines the item click listener for the ListView.

private class ItemList implements OnItemClickListener{

public void onItemClick(AdapterView<?> parent, View view, int position, long id) {

    l.setSelector(R.drawable.selection_style); //apply background style to the selected item
    ViewGroup vg=(ViewGroup)view;
    String selectedItem = ((TextView) vg.findViewById(R.id.label)).getText().toString();
    path=path+"/"+selectedItem; //append the item to path
    listFiles(); //update files and directories of the list when a file or directory

    }
}
In the onItemClick method, the selection style is applied to the selected item of the ListView by using the setSelector method. You need to pass the layout that applies the selection style to the selected item (selection_style.xml). When an item of the ListView is selected, you can access this item by using the view argument. As you already know, an item of the ListView contains two parts--image and text. Each part is represented by different component (ImageView and TextView), So you need to cast the view to a ViewGroup object. Within the ViewGroup object, you can refer to any component that it contains.

The path variable is updated to reflect the current path of the selected file or directory. The listFiles method is called again to update the contents of the ListView.
In the listFiles method, a File object is created to point to the current path so you can determine that the current path is directory or file. If it is a directory, its contents will be listed. Otherwise, the current file path is captured and the path variable is updated to its parent directory. The selected path of the file can be accessed by using the getPath method.

In this method, you also see a class called ListAdapterModel. The ListAdapterModel is a class that extends the ArrayAdapter class. As you already know from my previous post (Web Downloader), ArrayAdapter is used as data source of the ListView. If an item of the ListView has only one text component, there is no need to extend the ArrayAdapter. However, in this app, an item of the ListView contains two parts--image and text. So, the ArrayAdapter has to be extended. To enable the item to display both image and text, you need to override the getView method of the ArrayAdapter class. Below is the content of the ListAdapterModel.java file.
compass app flashLight app

ListAdapterModel.java

package com.example.filechooser;
import java.io.File;
import android.content.Context;
import android.view.LayoutInflater;
import android.view.View;
import android.view.ViewGroup;
import android.widget.ArrayAdapter;
import android.widget.ImageView;
import android.widget.TextView;

public class ListAdapterModel extends ArrayAdapter<String>{
int groupid;
String[] names;
Context context;
String path;
public ListAdapterModel(Context context, int vg, int id, String[] names, String parentPath){
super(context,vg, id, names);
this.context=context;
groupid=vg;
this.names=names;
this.path=parentPath;
}
public View getView(int position, View convertView, ViewGroup parent) {

        LayoutInflater inflater = (LayoutInflater) context.getSystemService(Context.LAYOUT_INFLATER_SERVICE);
        View itemView = inflater.inflate(groupid, parent, false);
        ImageView imageView = (ImageView) itemView.findViewById(R.id.icon);
        TextView textView = (TextView) itemView.findViewById(R.id.label);
        String item=names[position];
        textView.setText(item);
        File f=new File(path+"/"+item);
        if(f.isDirectory())
        imageView.setImageDrawable(context.getResources().getDrawable(R.drawable.diricon));
        else
        imageView.setImageDrawable(context.getResources().getDrawable(R.drawable.fileicon));
        return itemView;
     
}

}


Now, you have set up the FileChooser dialog. It is ready to use in your activity. For testing, in the onStart method of the MainActivity class, you can create an instance of the AndFileChooser class and call its show method to display the dialog.

MainActivity.java file

package com.example.filechooser;
import android.os.Bundle;
import android.app.Activity;
import android.view.Menu;
import android.widget.Toast;

public class MainActivity extends Activity {

    @Override
    protected void onCreate(Bundle savedInstanceState) {
        super.onCreate(savedInstanceState);
        setContentView(R.layout.activity_main);
    }

    protected void onStart(){
    super.onStart();
    AndFileChooser filechooser=new AndFileChooser("/",this);
    filechooser.show();
   
    }
    @Override
    public boolean onCreateOptionsMenu(Menu menu) {
        // Inflate the menu; this adds items to the action bar if it is present.
        getMenuInflater().inflate(R.menu.main, menu);
        return true;
    }
 
}


Don't forget to run the app, otherwise the file chooser does not display.


FileChooser run on Emulator

Download apk file of the FileChooser app

Merge or Combine PDF, Txt, Images

Saturday, September 21, 2013

Text Viewer

TextViewer is a simple app that can be used to view files that store text. For this simple text viewer app, you can view txt, rtf, xml, java, and html files. To start developing this app, you need to create a project called TextViewer in Eclipse.
There are two sub-interfaces in this app. For the first sub-interface, there are one EditText, and one ListView. The EditText allows you to input and displays the part of a directory of file. It is used as a search box in a dictionary. The ListView shows the files and directories of the directory that is shown in the EditText.
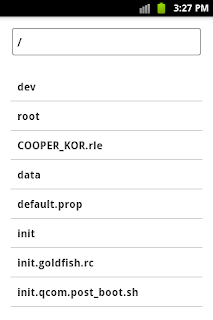
TextViewer Files browse interface


While you are making change to the text in the EditText, the contents (files and directories) of the valid directory shown in the EditText are displayed in the ListView. This sub-interface displays immediately when the user clicks the TextViewer app to launch and this is the place that the user can choose a file to open. The class that represents this sub-interface is called BrowseFragment. This class extends the Fragment class. The layout file for this sub-interface is browse_view.xml. Below are the contents of the BrowseFragment.java and browse_view.xml files. If you are new to the uses of Fragment and FragmentAcvitity in Android, please go back to this previous post Login.

BrowseFragent.java file

package com.example.textviewer;

import com.actionbarsherlock.app.SherlockFragment;
import android.os.Bundle;
import android.support.v4.app.Fragment;
import android.view.LayoutInflater;
import android.view.View;
import android.view.ViewGroup;
public class BrowseFragment extends SherlockFragment {
public View onCreateView(LayoutInflater inflater, ViewGroup container,
Bundle savedInstanceState) {
// Inflate the layout for this fragment
return inflater.inflate(R.layout.browse_view, container, false);
}

public static BrowseFragment newInstance(String str){

return(new BrowseFragment());
}
/*
public void onAttach(Activity activity){
super.onAttach(activity);
mAct=activity;
}
*/

public void onStart(){
super.onStart();

}


}


browse_view.xml file

<RelativeLayout xmlns:android="http://schemas.android.com/apk/res/android"
    xmlns:tools="http://schemas.android.com/tools"
    android:layout_width="match_parent"
    android:layout_height="match_parent"
>

    <EditText
        android:id="@+id/txt_input"
        android:layout_width="match_parent"
        android:layout_height="wrap_content"
        android:hint="@string/text_hint" />
     <TextView
        android:id="@+id/txt_view"
        android:layout_width="match_parent"
        android:layout_height="wrap_content"
         android:layout_below="@+id/txt_input"
      />
    <ListView
        android:id="@+id/files_list"
        android:layout_width="fill_parent"
        android:layout_height="wrap_content"
        android:layout_below="@+id/txt_view"
        >
     
    </ListView>

</RelativeLayout>


The strings.xml file that declares strings resources to be used in this app is written as shown below:
<?xml version="1.0" encoding="utf-8"?>
<resources>
    <string name="app_name">TextViewer</string>
    <string name="action_settings">Settings</string>
    <string name="text_hint">Type a path</string>

</resources>


The second sub-interface that is represented by the ContentFragment class contains a TextViewer to display the content of the selected file. The ContentFragment class also extends the Fragment class. The layout file for this sub-interface is content_view.xml file. Now you take a look at the ContentFragment.java file and then the content of the content_view.xml file.

ContentFragment.java

package com.example.textviewer;

import java.io.FileInputStream;
import java.io.IOException;

import com.actionbarsherlock.app.SherlockFragment;

import android.app.Activity;
import android.os.Bundle;
import android.text.method.ScrollingMovementMethod;
import android.view.LayoutInflater;
import android.view.View;
import android.view.ViewGroup;
import android.widget.TextView;

public class ContentFragment extends SherlockFragment{
//@Override
private static String arg;
public View onCreateView(LayoutInflater inflater, ViewGroup container, Bundle savedInstanceState) {
// Inflate the layout for this fragment
return inflater.inflate(R.layout.content_view, container, false);
}
public static ContentFragment newInstance(String str){
arg=str;
return(new ContentFragment());
}


public void onAttach(Activity activity){
super.onAttach(activity);
}

public void onStart(){
super.onStart();
showContent(arg);
}

public void showContent(String path){

TextView txtview = (TextView)getActivity().findViewById(R.id.cont_view);
txtview.setMovementMethod(new ScrollingMovementMethod());
try{
FileInputStream fs=new FileInputStream(path);
int data=0;
while((data=fs.read())!=-1){
char c=(char)data;
txtview.append(c+"");
}
fs.close();
}catch(IOException ie){}
}


}


In the ContentFragment class, the arg variable is used to store the file path selected by the user. This file path is sent from the main activity that is represented by the MainActivity class discussed later in this post. Once the file path is obtained, the content of the file can be read by invoking the showContent method. FileInputStream class is also available in Android to read content of a binary file.

content_view.xml file

<?xml version="1.0" encoding="utf-8"?>
<RelativeLayout xmlns:android="http://schemas.android.com/apk/res/android"
    xmlns:tools="http://schemas.android.com/tools"
    android:layout_width="match_parent"
    android:layout_height="match_parent"  
    android:background="#dfdfdf"    
     >

 <TextView
     android:id="@+id/cont_view"
     android:layout_width="fill_parent"
     android:layout_height="fill_parent"
     android:maxLines="20"
     android:scrollbars="vertical"
     android:textSize="13sp"
     android:textColor="#000000" />

</RelativeLayout>


Besides launching the TextView app directly from the Android apps launcher, the user can select a text file from Android to view. To make this possible, you have to write some intent filters in AndroidManifest.xml file. The content of the AndroidManifest.xml file is shown below.

AndroidManifest.xml file

<?xml version="1.0" encoding="utf-8"?>
<manifest xmlns:android="http://schemas.android.com/apk/res/android"
    package="com.example.textviewer"
    android:versionCode="1"
    android:versionName="1.0"
 
     >

    <uses-sdk
        android:minSdkVersion="8"
        android:targetSdkVersion="17" />

    <application    
        android:allowBackup="true"
        android:icon="@drawable/textview"
        android:label="@string/app_name"
        android:theme="@style/Theme.Sherlock.Light.DarkActionBar"
     
       
         >
        <activity
            android:configChanges="orientation"
            android:name="com.example.textviewer.MainActivity"
            android:label="@string/app_name" >
            <intent-filter>
                <action android:name="android.intent.action.MAIN" />
                <category android:name="android.intent.category.LAUNCHER" />
            </intent-filter>
            <intent-filter>
            <action android:name="android.intent.action.VIEW"/>
            <action android:name="android.intent.action.PICK"/>
            <category android:name="android.intent.category.DEFAULT"/>
            <category android:name="android.intent.category.BROWSABLE"/>
            <data android:scheme="file"/>
            <data android:mimeType="*/*"/>
            <data android:pathPattern=".*\\.txt"/>
            <data android:host="*"/>
        </intent-filter>
        <intent-filter>
            <action android:name="android.intent.action.VIEW"/>
            <action android:name="android.intent.action.PICK"/>
            <category android:name="android.intent.category.DEFAULT"/>
            <category android:name="android.intent.category.BROWSABLE"/>
            <data android:scheme="file"/>
            <data android:mimeType="*/*"/>
            <data android:pathPattern=".*\\.rtf"/>
            <data android:host="*"/>
        </intent-filter>
        <intent-filter>
            <action android:name="android.intent.action.VIEW"/>
            <action android:name="android.intent.action.PICK"/>
            <category android:name="android.intent.category.DEFAULT"/>
            <category android:name="android.intent.category.BROWSABLE"/>
            <data android:scheme="file"/>
            <data android:mimeType="*/*"/>
            <data android:pathPattern=".*\\.java"/>
            <data android:host="*"/>
        </intent-filter>
        <intent-filter>
            <action android:name="android.intent.action.VIEW"/>
            <action android:name="android.intent.action.PICK"/>
            <category android:name="android.intent.category.DEFAULT"/>
            <category android:name="android.intent.category.BROWSABLE"/>
            <data android:scheme="file"/>
            <data android:mimeType="*/*"/>
            <data android:pathPattern=".*\\.xml"/>
            <data android:host="*"/>
        </intent-filter>
        <intent-filter>
            <action android:name="android.intent.action.VIEW"/>
            <action android:name="android.intent.action.PICK"/>
            <category android:name="android.intent.category.DEFAULT"/>
            <category android:name="android.intent.category.BROWSABLE"/>
            <data android:scheme="file"/>
            <data android:mimeType="*/*"/>
            <data android:pathPattern=".*\\.html"/>
            <data android:host="*"/>
        </intent-filter>
       
        </activity>
    </application>

</manifest>


Since the TextView app is able to view txt, rtf, xml, java, and html file, you need to have five separate intent filters for these file types. Each intent filter is almost the same, except the path pattern. In each path pattern, different file extension has to be specified for the supported file type. If you are new to the use of intent filter, i recommend you to read the previous post Web Downloader app.

Now we take a look at our main interface. The main interface that is represented by the MainActvity class. This class extends the FragmentAcvity class. On the main interface, the sub-interfaces (BrowseFragment and ContentFragment) are dynamically added and replaced. When the app firstly run (by launching it directly from the Android apps launcher), the first sub-interface is added to the main interface by the code fragment below.

BrowseFragment bf=new BrowseFragment();
getSupportFragmentManager().beginTransaction().add(R.id.fragment_container,bf).commit();


The first sub-interface is replaced by the second sub-interface, when the user selects a file from the ListView to view  so that the content of the selected file is read in the ContentFragment to display on the TextView, cont_view.

ContentFragment cf=ContentFragment.newInstance(path);
FragmentTransaction transact=getSupportFragmentManager().beginTransaction();
transact.replace(R.id.fragment_container, cf);
transact.addToBackStack(null);
transact.commit();

As i mentioned about, you can open the TextViewer app by two ways. One way is opening it directly from the Android apps launcher. For the second way, the user can select a file from Android to open it. How do you know which file is selected by the user? Of course, it is simple to understand. When the user select the file, an intent object that stored path of the file is broadcast by Android. Android lists apps that can open the file. Our TextViewer app is capable to open the file because we used intent filters to inform Android already. So Android will show the TextViewer app in its list. To get the intent object sent by Android, you need to use the getIntent method. When you have the intent object, you can get the path of the selected file. And then its content is read and displayed by calling the openFile method. This method subsequently calls the show method. The code fragment below does the job.

Intent intent=getIntent();
String action=intent.getAction();
String type =intent.getType();
if(Intent.ACTION_VIEW.equals(action) || Intent.ACTION_PICK.equals(action) && type!=""){
openFile(intent);

}

MainActivity.java file

package com.example.textviewer;

import java.io.File;
import com.actionbarsherlock.app.SherlockFragmentActivity;
import com.actionbarsherlock.view.MenuItem;
import android.content.Intent;
import android.os.Bundle;
import android.support.v4.app.FragmentTransaction;
import android.text.Editable;
import android.text.TextWatcher;
import android.util.TypedValue;
import android.view.View;
import android.widget.AdapterView;
import android.widget.AdapterView.OnItemClickListener;
import android.widget.ArrayAdapter;
import android.widget.EditText;
import android.widget.ListView;
import android.widget.TextView;
import android.widget.Toast;

public class MainActivity extends SherlockFragmentActivity {
float nsize=13.0f;
protected void onCreate(Bundle savedInstanceState) {
        super.onCreate(savedInstanceState);
        setContentView(R.layout.activity_main);

        //Get intent object broadcast by other Android
        //when the user selects a file to open from Android
        Intent intent=getIntent();
        String action=intent.getAction();      
        String type =intent.getType();
        if(Intent.ACTION_VIEW.equals(action) || Intent.ACTION_PICK.equals(action) && type!=""){        
        openFile(intent); //open and read the content of the file
       
        }

        //If no intent, display the BrowseFragment to show a list of files and directories.
        //From this interface the user will select a file to view

        else{
        BrowseFragment bf=new BrowseFragment();
        getSupportFragmentManager().beginTransaction().add(R.id.fragment_container,bf).commit();
        }
    }

public void openFile(Intent intent){
String path=intent.getData().getPath();//read file path from the intent
//then show the content of the file
show(path);
}

public void onStart(){
super.onStart();
regControls(); //register event listeners with EditText and ListView
TextView txtview = (TextView) findViewById(R.id.cont_view);
if(txtview==null)
getSherlock().getActionBar().hide(); //hide ActionBar when you are not on the ContentFragment    
else
getSherlock().getActionBar().show(); //show ActionBar when you are on the ContentFragment
//This will show up zoom in and zoom out image icons on the ActionBar
}

//Handle hardware back button press
public void onBackPressed() {
TextView txtview = (TextView) findViewById(R.id.cont_view);
if(txtview!=null){
BrowseFragment df=new  BrowseFragment();
FragmentTransaction transact=getSupportFragmentManager().beginTransaction();
transact.replace(R.id.fragment_container, df);
transact.addToBackStack(null);
transact.commit();
onStart();
}
else{

System.exit(0);
}
}

public void regControls(){
EditText et=(EditText) findViewById(R.id.txt_input);
if(et!=null){
et.addTextChangedListener(new ChangeListener());//listen to text change event
et.setText("/"); //initialize the path to /
ListView lv=(ListView) findViewById(R.id.files_list);
lv.setOnItemClickListener(new ClickListener());//listen to item click event
}
}

public void zoomin(View view){
TextView tv=(TextView) findViewById(R.id.cont_view);
nsize++;
tv.setTextSize(TypedValue.COMPLEX_UNIT_DIP,nsize);

}

public void zoomout(View view){
TextView tv=(TextView) findViewById(R.id.cont_view);
nsize--;
tv.setTextSize(TypedValue.COMPLEX_UNIT_DIP,nsize);

}

class ChangeListener implements TextWatcher{
   
    public void beforeTextChanged(CharSequence s, int start, int before, int count){
   
   
    }
    //Making change to text of the EditText, txt_input
    public void onTextChanged(CharSequence s, int start, int before, int count){
    EditText et=(EditText) findViewById(R.id.txt_input);
    String txt=et.getText().toString();
    listDirContents(txt);//display the files and directories in the ListView
    }
   
    public void afterTextChanged(Editable ed){
   
   
    }
    }
 
    class ClickListener implements OnItemClickListener{
      public void onItemClick(AdapterView<?> parent, View view, int position, long id) {
      // selected item
            String selectedItem = ((TextView) view).getText().toString();
            EditText et=(EditText) findViewById(R.id.txt_input);
            et.append("/"+selectedItem);//append selected item to the path
            show(et.getText().toString());//show the content of the input path if it is a file.
         
           
      }
      public void onNothingSelected(AdapterView<?> parent){
     
      }
     
     
      }


    public void listDirContents(String path){
    ListView l=(ListView) findViewById(R.id.files_list);
    if(path!=null){
    try{
    File f=new File(path);    
    if(f!=null){
    String[] contents=f.list();
    if(contents.length>0){
    ArrayAdapter<String> aa=new ArrayAdapter<String>(this,R.layout.listlayout,contents);
    l.setAdapter(aa);
    }
    }
    }catch(Exception e){}
    }


    }

    public void show(String path){
    Toast.makeText(getBaseContext(), "Opening "+path, Toast.LENGTH_SHORT).show();
    try{
    File f=new File(path);
    if(f.isFile()){//display ContentFragment to display the content of the selected file
    ContentFragment cf=ContentFragment.newInstance(path);
    FragmentTransaction transact=getSupportFragmentManager().beginTransaction();
    transact.replace(R.id.fragment_container, cf);
    transact.addToBackStack(null);
    transact.commit();
    getSherlock().getActionBar().show();
    }
    }catch(Exception e){}
    }
 
 
    @Override
    public boolean onCreateOptionsMenu(com.actionbarsherlock.view.Menu menu) {
        getSupportMenuInflater().inflate(R.menu.main, menu);
        return super.onCreateOptionsMenu(menu);
    }

    @Override
    public boolean onOptionsItemSelected(MenuItem item) {
        super.onOptionsItemSelected(item);
        TextView txtview = (TextView) findViewById(R.id.cont_view);
     
        if(txtview!=null){
        switch(item.getItemId()){
       
            case R.id.zoomin:
            zoomin(txtview);
                break;

            case R.id.zoomout:
            zoomout(txtview);
                break;

        }
     
        return true;
        }
        else return false;
    }


}


Set up ActionBar for TextViewer app


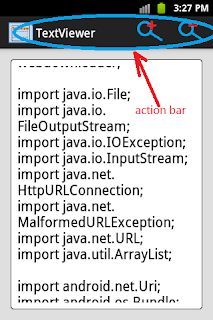
ActionBar displays at the top your user interface. Generally, the ActionBar are used to placed some actions that are frequently used. In the TextViewer app, the zoom in and zoom out actions are placed on the ActioBar. The items of the ActionBar are written in the main.xml file (in res/menu directory). This ActionBar is shown only if the second sub-interface (ContentFragment) displays.


Here is the content of the main.xml file.
<menu xmlns:android="http://schemas.android.com/apk/res/android"
    style="@style/Theme.Sherlock" >
    <item
        android:id="@+id/zoomin"
        android:showAsAction="ifRoom|withText"
        android:icon="@drawable/zoomin"
        style="@style/Theme.Sherlock"
    />

    <item
        android:id="@+id/zoomout"
        android:showAsAction="ifRoom|withText"
        android:icon="@drawable/zoomout"
        style="@style/Theme.Sherlock"
    />

</menu>

You will have two small images in res/drawable directory. One represents the zoom in action and another one for zoom out action.
The main activity displays the ActionBar in its onCreateOptionsMenu method. The code fragment below shows this point.

public boolean onCreateOptionsMenu(com.actionbarsherlock.view.Menu menu) {
getSupportMenuInflater().inflate(R.menu.main, menu);
return super.onCreateOptionsMenu(menu);
}

You will need to override the onOptionsItemSelected method to determine which item (zoom in or zoom out) of the ActionBar is selected. The switch case statement can be used to check the id of the item that is selected.

The library that is used to set up the ActionBar in the TextViewer is ActionBarSherkLock. The reason to choose this library is that it supports older Android versions (lower than 3.0) and still can be used in newer versions. You can download the ActionBarSherkLock library from the link http://actionbarsherlock.com/download.html. You will get a zip file that contains the ActionBarSherkLock project inside. Extract the zip file and place its contents to a place that you can find it easily.
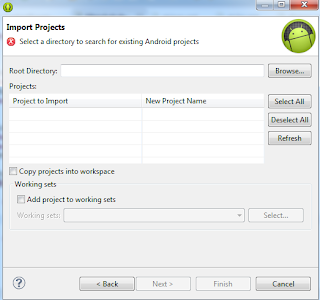
Now you need to add the ActionBarSherkLock project to the TextViewer app. In the File menu, select New then select Project...When the New Project window displays, Click Android to expand it. Then select Android Project from Existing Code. By clicking the Next button, you will get the Import Projects window. Click the Browse button to find the directory that contains the ActionBarSherkLock project (from the zip file you just extracted).

image actionbarsherklock project


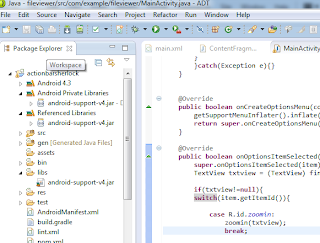
Now the ActionBarSherkLock project is included in the Package Explorer (shown at top left corner).

sherklocklock added to the project


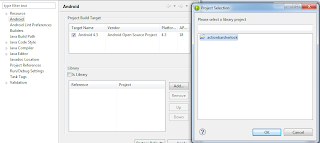
For the next step, you need to add the ActonBarSherkLock project as a library of the TextViewer app. You can accomplish this task by right-click on the TextViewer then selection Android. Click the Add... button to open the Project Selection dialog then select actionbarsherlock. Click Ok to close the dialog. Please the see the picture below to clarify these steps.

Add actionbarsherklock as a library to the TextViewer app


ActionBarSherkLock uses android-support-v4 library jar file. This will conflict with the android-support-v4 libary jar file that you have when you first create the TextView app. To avoid this problem, you need to delete android-support-v4 libary jar file that comes with the TextView app.

Now you are ready to run the TextViewer app. Upload the TextView.apk file and install it on your real device and test it. If your any question regarding this sample app, please leave comments below.

Download apk file of the Text Viewer app

Wednesday, September 18, 2013

Web download

In this post, you learn to create a simple web donwloader app in Android. The web downloader app can download any file (including html pages) that is referred to by a link shown on a browser or a link that the user types in the address text box. To start developing the web download app, you need to create a project in Eclipse. The project name will be called WebDownloader.

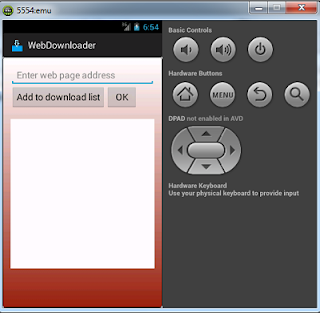
web downloader user interface


On the app user interface, we need one EditText, two Buttons, and one Listview. The EditText view allows the user to enter the address or url of the file to be downloaded. If the user selects a link from the browser, this text box will display the address or url of the link. The first Button labeled "Add to download list" is pushed to add the address in the text box to the ListView for later downloading. The second Button will be pushed to start the download process. It is labeled "OK". These views are defined in the activity_main.xml as shown below.

<LinearLayout xmlns:android="http://schemas.android.com/apk/res/android"
xmlns:tools="http://schemas.android.com/tools"
android:layout_width="match_parent"
android:layout_height="match_parent"
android:paddingBottom="@dimen/activity_vertical_margin"
android:paddingLeft="@dimen/activity_horizontal_margin"
android:paddingRight="@dimen/activity_horizontal_margin"
android:paddingTop="@dimen/activity_vertical_margin"
tools:context=".MainActivity"
android:orientation="vertical"
android:background="@drawable/back_style"
>

<EditText
android:id="@+id/txt_input"
android:layout_width="fill_parent"
android:layout_height="wrap_content"
android:inputType="text"
android:hint="@string/txt_hint"
/>
<LinearLayout
android:layout_width="wrap_content"
android:layout_height="wrap_content"
android:orientation="horizontal"
>
<Button
android:id="@+id/bt_add"
android:layout_width="wrap_content"
android:layout_height="wrap_content"
android:text="@string/bt_label"
android:onClick="addClick"
/>
<Button
android:id="@+id/bt_ok"
android:layout_width="wrap_content"
android:layout_height="wrap_content"
android:text="@string/bt_ok"
android:onClick="okClick"
/>
</LinearLayout>
<TextView
android:id="@+id/txt_view"
android:layout_width="fill_parent"
android:layout_height="wrap_content"
/>
<ListView
android:id="@+id/url_list"
android:layout_width="fill_parent"
android:layout_height="300dp"
android:paddingBottom="20dp"
android:paddingTop="20dp"
android:background="#f8f8f8"
/>

</LinearLayout>

To apply the backround to user interface, we need a resource file called back_style.xml stored in the drawable directory. This file defines the look and feel of the app background. To apply the background style to the user interface this file must be defined as a value of background property of the LinearLayout view (android:background="@drawable/back_style").

<?xml version="1.0" encoding="utf-8"?>
<selector xmlns:android="http://schemas.android.com/apk/res/android">
<item>
<shape>
<gradient
android:startColor="#ffffff"
android:endColor="#992211"
android:angle="270" />
<stroke
android:width="1dp"
android:color="#171717" />
<corners
android:radius="4dp" />
<padding
android:left="10dp"
android:top="10dp"
android:right="10dp"
android:bottom="10dp" />
</shape>
</item>
</selector>


Some string resources that are used by the views are written in the strings.xml file. The content of the strings.xml file is shown below.

<?xml version="1.0" encoding="utf-8"?>
<resources>
<string name="app_name">WebDownloader</string>
<string name="action_settings">Settings</string>
<string name="bt_label">Add to download list</string>
<string name="txt_hint">Enter web page address</string>
<string name="bt_ok">OK</string>
</resources>

As mentioned above, the user can launch the web downloader app by two ways. One is by selecting a link from the browser and another is by launching it directly from the Android applications laucher. For the first way, the web downloader app needs to be listed in the app choices list to view or download the file that is refered to by the link. You can have your apps to diplay in the popup list by defining intent filters in the AndroidManifest.xml file of the app. The intent filters specify the capacity that the web downloader app can do in terms of actions to be performed, and data to operate on. By doing this, the Android system know how to capture intents that match the capacity of the app and ignore intents that do not match. An intent is a data structure that contains data and operations on the data. It can be used to send and receive data in an app or between apps.

Display web downloader in popuup list of apps choices


To define an intent filter, you need to use the <intent_filter> tag. This tag will be placed in the activity, service, or broadcast receiver that will receive the intent. When defining an intent filter, there are three parts that need to be considered. The first part specifies the action the app can do. In this example app, the action that the app can do is VIEW action. The VIEW action tells the Android that the web downloader app can download and display the content of the link. When this action is specified, the intent will contain the address or url of the link and so we can write code to get the link and download data from the link. The code to do these tasks are written in the MainActivity.java file that is shown later in this post. The second part determines the kind of the intents that will be received by the web downloader appp. The DEFAULT category allows the Android system to capture intents that do not have a category. In most cases, we use this category. The BROWABLE category tells Android to filter intents that are in browsable category (displayable and downloadable). The final part can be used to specify the type of data, or url (including scheme, host, and file path). In this app, we allow any file to be downloaded so the type of data can be specified by a value of "*/*" to the mimeType property. Sine the file to be downloaded is from the internet and from any host, the value of the scheme property will be "http" and the value for the host is "*".

<intent-filter>
<action android:name="android.intent.action.VIEW"></action>
<category android:name="android.intent.category.DEFAULT"></category>
<category android:name="android.intent.category.BROWSABLE"></category>
<data android:mimeType="*/*" android:scheme="http" android:host="*"></data>
</intent-filter>

For reference documentation about defining intent filter and its related parts, you can visit android developer website.

In this example app, the AndroidManifest.xml looks like the following.

<?xml version="1.0" encoding="utf-8"?>
<manifest xmlns:android="http://schemas.android.com/apk/res/android"
package="com.example.webdownloader"
android:versionCode="1"
android:versionName="1.0" >
<uses-sdk
android:minSdkVersion="8"
android:targetSdkVersion="17" />
<uses-permission android:name="android.permission.INTERNET"/>
<uses-permission android:name="android.permission.ACCESS_NETWORK_STATE"/>
<uses-permission android:name="android.permission.WRITE_EXTERNAL_STORAGE"/>
<application
android:allowBackup="true"
android:icon="@drawable/wd"
android:label="@string/app_name"
android:theme="@style/AppTheme" >
<activity android:configChanges="orientation"
android:name="com.example.webdownloader.MainActivity"
android:label="@string/app_name" >
<intent-filter>
<action android:name="android.intent.action.MAIN" />
<category android:name="android.intent.category.LAUNCHER" />
</intent-filter>
<intent-filter>
<action android:name="android.intent.action.VIEW"></action>
<category android:name="android.intent.category.DEFAULT"></category>
<category android:name="android.intent.category.BROWSABLE"></category>
<data android:host="*" android:scheme="http"></data>
</intent-filter>
</activity>

<service
android:name="DownloadService"
android:icon="@drawable/ic_launcher"
android:label="MYSERVICE">
</service>
</application>
</manifest>


In the AndroidManifest.xml file we also define the permissions for the web downloader app. The first permision allows the app to use the internet, the second permision to access the network connection states, and the final permision to read and write data to the external storage (sdcard).

<uses-permission android:name="android.permission.INTERNET"/>
<uses-permission android:name="android.permission.ACCESS_NETWORK_STATE"/>
<uses-permission android:name="android.permission.WRITE_EXTERNAL_STORAGE"/>

The last part of the AndroidManifest.xml file, we declare a service. The name of the service is the same as the class that extends the Service or IntentService. A service can be used to do operations that need long time to complete. When doing long-time operations, the user interface is locked. So it does not respond to the user and this situation might make the user feel uncomfortable with your app. To avoid this problem, the operations need to be run in background. The IntentService class is used to do the downloading process in background in the web downloader appp because it can take long time to complete. A service can receive data (stored in an intent object) from an activity that requires the long-time process to be passed to the service and send the feedback information to the activity. In this app, the data to be sent from the main activity are the ArrayList object that store the urls of the links that were added to the ListView to download and the output directory to store the files downloaded. You need to override the onHandleIntent method to get the data stored in an intent object that is sent by the main activity.

DownloadService.java file

package com.example.webdownloader;
import java.io.File;
import java.io.FileOutputStream;
import java.io.IOException;
import java.io.InputStream;
import java.net.HttpURLConnection;
import java.net.MalformedURLException;
import java.net.URL;
import java.util.ArrayList;
import android.app.IntentService;
import android.content.Intent;
import android.os.Bundle;
import android.util.Log;

public class DownloadService extends IntentService {
private ArrayList<String> urlist;
private String storeDir;
public DownloadService() {
super("SERVICE");
// TODO Auto-generated constructor stub
}

public void onHandleIntent(Intent intent){
Bundle b=intent.getExtras();
if(b!=null){
urlist=b.getStringArrayList("URLS");
storeDir=b.getString("OUTDIR");
startDownload();
}


}

public void startDownload(){
String feedback="";
if(urlist.size()>0){
try {
for(int i=0;i<urlist.size();i++){    

URL url=new URL(urlist.get(i));
readDataStream(url);

}

feedback="Complete! Check the webdownload directory on your sdcard";

} catch (MalformedURLException e) { e.printStackTrace();}
}
else{

feedback="No url is added to the download list.";
}
//send feedback message to the main activity
Intent backIntent=new Intent("com.example.webdownloader");
backIntent.putExtra("BACKMESS", feedback);
sendBroadcast(backIntent);

}
public void readDataStream(URL url){
    try {
   
    File f=new File(storeDir);
    if(f.exists()){
    HttpURLConnection con=(HttpURLConnection)url.openConnection();
    InputStream is=con.getInputStream();
    String path=url.getPath();
    String filename=path.substring(path.lastIndexOf('/')+1);
    FileOutputStream fos=new FileOutputStream(storeDir+"/"+filename);
    int data=0;
    while((data=is.read())!=-1){
    fos.write(data);
    }
    is.close();
    fos.flush();
    fos.close();
    }
    else
    Log.e("Error","Not found "+storeDir);

} catch (IOException e) {
e.printStackTrace();
}
   
    }
}


To download content of a file that is refered to by a link, you can use the HttpURLConnection class. You can have HttpURLConnection object by using the openConnection method of the URL class.

HttpURLConnection con=(HttpURLConnection)url.openConnection();

HttpURLConnection class has the getInputStream method that returns an InputStream object. When you have the InputStream object, you can use its read method to read content of the file and write it to an output file by using the FileOutputStream class.

The final part of the web downloader app is MainActivity.java file. In this file, we use the ArrayList to store the addresses or urls that are added to the ListView. To use the ArrayList object as an datasource of the ListView, you need to create an ArrayAdapter object to encaptulate the ArrayList object. When creating the ArrayAdapter object you need to provide three values: context, layout of the ListView, and the ArrayList object. Then supply this adapter object to the ListView by using its setAdapter method.

aa=new ArrayAdapter<String>(this,R.layout.listlayout,urlist);
lv.setAdapter(aa);

The layout of the ListView view is defined in the listlayout.xml file in res/layout directory.

<?xml version="1.0" encoding="utf-8"?>
<!-- Single List Item Design -->
<TextView xmlns:android="http://schemas.android.com/apk/res/android"
android:id="@+id/label"
android:layout_width="fill_parent"
android:layout_height="fill_parent"
android:padding="10sp"
android:textSize="16sp"
android:textStyle="bold" >
</TextView>

MainActivity.java file

package com.example.webdownloader;
import java.io.File;
import java.util.ArrayList;
import android.net.Uri;
import android.os.Bundle;
import android.os.Environment;
import android.app.Activity;
import android.content.BroadcastReceiver;
import android.content.Context;
import android.content.Intent;
import android.content.IntentFilter;
import android.util.Log;
import android.view.Menu;
import android.view.View;
import android.widget.ArrayAdapter;
import android.widget.Button;
import android.widget.EditText;
import android.widget.ListView;
import android.widget.TextView;


public class MainActivity extends Activity {

    private ListView lv;
    private ArrayList<String> urlist;
    private ArrayAdapter<String> aa;
    private String storeDir;
    protected void onCreate(Bundle savedInstanceState) {
        super.onCreate(savedInstanceState);
        setContentView(R.layout.activity_main);
        urlist=new ArrayList<String>();
        aa=new ArrayAdapter<String>(this,R.layout.listlayout,urlist);
        lv=(ListView)findViewById(R.id.url_list);
        lv.setAdapter(aa);
        Intent intent=getIntent();
        String action=intent.getAction();      
        if(Intent.ACTION_VIEW.equals(action)){        
        Uri uri=intent.getData();
        EditText txturl=(EditText)findViewById(R.id.txt_input);
        txturl.setText(uri.toString());
       
        }

     
    }

    protected void onStart(){
    super.onStart();
    createStoreDir();
    }
 
    protected void onResume(){
    super.onResume();
    registerReceiver(receiver, new IntentFilter("com.example.webdownloader"));    
    }
 
    protected void onPause(){
    super.onPause();
    unregisterReceiver(receiver);
   

    }
 
    private BroadcastReceiver receiver=new BroadcastReceiver(){
    public void onReceive(Context context,Intent intent){
   
        Bundle b=intent.getExtras();
        if(b!=null){
        TextView tv=(TextView)findViewById(R.id.txt_view);
        tv.setText(b.getString("BACKMESS"));
        }
    }
    };

 
    public void createStoreDir(){
    storeDir=Environment.getExternalStorageDirectory()+"/webdownload";
File f=new File(storeDir);
if(!f.exists())
if(!f.mkdir()){
Log.e("Error","Can't create webdownload directory");
disableButtons();
}
    }
 
    public void disableButtons(){
    Button btadd=(Button)findViewById(R.id.bt_add);
    Button btok=(Button)findViewById(R.id.bt_ok);
    btadd.setEnabled(false);
    btok.setEnabled(false);
    }
    public boolean onCreateOptionsMenu(Menu menu) {
        // Inflate the menu; this adds items to the action bar if it is present.
        getMenuInflater().inflate(R.menu.main, menu);
        return true;
    }
     
    public void addClick(View view){
    EditText txturl=(EditText)findViewById(R.id.txt_input);
    String url=txturl.getText().toString();
    if(url.length()>0){
    urlist.add(url);
    aa.notifyDataSetChanged();
    }
    }
    public void okClick(View view){
    TextView tv=(TextView)findViewById(R.id.txt_view);
    tv.setText("Please wait...");
    Intent newIntent=new Intent(this,DownloadService.class);
    newIntent.putStringArrayListExtra("URLS", urlist);
    newIntent.putExtra("OUTDIR",storeDir);    
    startService(newIntent);

    }

}


The Intent object (called intent) can be obtained by using the getIntent method of the Activity class. This intent object contains the url of the selected link. To get the url from the intent object, you need to use the getData method of the Intent class.
Intent intent=getIntent();
String action=intent.getAction();
if(Intent.ACTION_VIEW.equals(action)){
Uri uri=intent.getData();
//more code here
}

To receive feedback message from the Service (DownloadService), the MainActivity needs to register a BroadcastRecevier by using the registerReceiver method when the activity starts.

registerReceiver(receiver, new IntentFilter("com.example.webdownloader"));

The receiver can be unregistered by using the unregisterReceiver method. This code fragment is usually placed in the onPause or onStop mehtod of the activity.

unregisterReceiver(receiver);

In the onReceive method of the BroadcastReceiver class, you can write some code to get the feedback message sent by the Service (stored in the intent object). The intent object has a method called getExtra that returns a Bundle object that the message is stored.

Bundle b=intent.getExtras();
if(b!=null){
TextView tv=(TextView)findViewById(R.id.txt_view);
tv.setText(b.getString("BACKMESS"));
}

When the user clicks the Add to download list button, the addClick method is called to add the address shown in the text box to the ArrayList and the ListView. When the OK button is pushed and the okClick method is called, the main activity sends an intent object that contains the ArrayList and output directory to the DownloadService. In this case, the intent object is constructed by specifying the context and the service class to start (DownloadService). Then you can call the startService to start the service.

Intent newIntent=new Intent(this,DownloadService.class);
newIntent.putStringArrayListExtra("URLS", urlist);
newIntent.putExtra("OUTDIR",storeDir);
startService(newIntent);

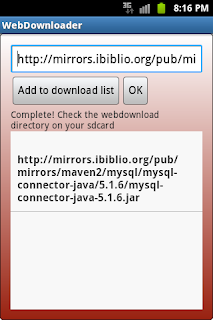
Now run the web downloader app. Then upload and install the WebDownload.apk to your real device. In your real device, make sure the internet is working. Start your web browser and find a download link. Select the download link and choose WebDownloader from the popup list. When the address of the download link shown in the text box, select the Add to download list button to add the address to the ListView then click the OK button.

run web download app for testing

Download apk file of the Web Downloader app