Pages

Sunday, September 15, 2013

Login

In this post, you learn to create a simple login app. Now open your Eclipse and create a new project called Login. If you don't know how to create a project in Eclipse, you probably need to read this post Helloworld app.
In this app, you are introduced to the Fragment class in Android. The Fragment class can be treated as a sub-activity or sub-interface. You can create many fragments as your want. Each user interface that is created by every fragment can be added, replaced, or removed from the main activity so that you have dynamic user interface in your app. To create a fragment, you need to extends the Fragment class and save it with java extension. In the Login app, we need to fragments. One fragment is called LoginFragment. This fragment is added to the main activity when the app first opens.

LoginFragment.java
package com.example.login;
import android.os.Bundle;
import android.support.v4.app.Fragment;
import android.view.LayoutInflater;
import android.view.View;
import android.view.ViewGroup;
public class LoginFragment extends Fragment {
@Override
public View onCreateView(LayoutInflater inflater, ViewGroup container, Bundle savedInstanceState) {
     // Inflate the layout for this fragment
       return inflater.inflate(R.layout.fragment_login, container, false);
    }

}

On this sub-interface, there are one TextView, two EditText, and one Button views. These views are loaded from the xml file called fragment_login. The content of the fragment.login.xml file is shown below.

<?xml version="1.0" encoding="utf-8"?>
<LinearLayout xmlns:android="http://schemas.android.com/apk/res/android"
xmlns:tools="http://schemas.android.com/tools"
android:layout_width="match_parent"
android:layout_height="match_parent"
android:orientation="vertical"
android:background="@drawable/back_style"
>
<TextView
android:id="@+id/txt_view"
android:layout_width="fill_parent"
android:layout_height="wrap_content"
android:text="@string/label"
android:textSize="20sp"
/>
<EditText
android:id="@+id/txt_user"
android:layout_width="fill_parent"
android:layout_height="wrap_content"
android:hint="@string/user_hint"
android:inputType="text" />
<EditText
android:id="@+id/txt_pwd"
android:layout_width="fill_parent"
android:layout_height="wrap_content"
android:hint="@string/pwd_hint"
android:inputType="textPassword" />
<Button
style="@style/AppTheme"
android:layout_width="wrap_content"
android:layout_height="wrap_content"
android:onClick="doLogin"
android:text="@string/bt_login" />
</LinearLayout>

Invalid login


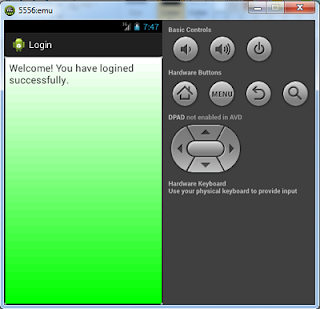
The TextView view is used to display the text "Login" at the top of the login form. One EditText allows the user to input the user name and another EditText is to input the password. The Login button validates the input data. If the login is invalid, the app only shows a message "Invalid login". Otherwise, the second fragment or sub-interface is displayed a welcome message "Welcome! You have loginned successfully.". For this simple app, the user name and password that are used in the validation process are defined as string resources in the strings. xml file. The string resources that are used in this layout file are defined in the strings.xml file. This is the content of the strings.xml file.

<?xml version="1.0" encoding="utf-8"?>
<resources>
<string name="app_name">Login</string>
<string name="action_settings">Settings</string>
<string name="hello_world">Hello world!</string>
<string name="user_hint">Enter user name</string>
<string name="pwd_hint">Enter password</string>
<string name="bt_login">Login</string>
<string name="label">Login</string>
<string name="username">myusername</string>
<string name="password">mypassword123</string>

</resources>
The second fragment is used to display the welcome message as mentioned above. This sub-interface shows when the login is valid. The layout file for this fragment is shown below.
<?xml version="1.0" encoding="utf-8"?>
<LinearLayout xmlns:android="http://schemas.android.com/apk/res/android"
xmlns:tools="http://schemas.android.com/tools"
android:layout_width="match_parent"
android:layout_height="match_parent"
android:background="@drawable/back_style"
>
<TextView
android:id="@+id/txtsucess_view"
android:layout_width="wrap_content"
android:layout_height="wrap_content"
android:textSize="20sp"
/>

</LinearLayout>
The backround of each fragment is defined by a resource file called back_style.xml. This file is stored in the res/drawable directory. The content of this file is shown below.
<?xml version="1.0" encoding="utf-8"?>
<selector xmlns:android="http://schemas.android.com/apk/res/android">
<item>
<shape>
<gradient
android:startColor="#ffffff"
android:endColor="#00ff00"
android:angle="270" />
<stroke
android:width="1dp"
android:color="#171717" />
<corners
android:radius="4dp" />
<padding
android:left="10dp"
android:top="10dp"
android:right="10dp"
android:bottom="10dp" />
</shape>
</item>
</selector>

The second fragment is defined in the java file called LogSucessFragment. To pass a value from the main activity to a fragment you need to define the constructor of the fragment class. This constructor is called newInstance. In this app, once the login is valid, the welcome message is passed from the main activity to the second fragment through this constructor. To refer to a view in the fragment, you need to user the getActivity method of the fragment class. This method returns the activity that passes data to the fragment. In this case it is the main activity. When you got the activity object, you can use its findViewById method to refer to any view within the fragment class.

LogSuccessFragment.java
package com.example.login;
import android.app.Activity;import android.os.Bundle;
import android.support.v4.app.Fragment;
import android.view.LayoutInflater;
import android.view.View;
import android.view.ViewGroup;
import android.widget.TextView;
public class LogSuccessFragment extends Fragment {
//@Override
//Activity mAct;
static String arg;
public View onCreateView(LayoutInflater inflater, ViewGroup container, Bundle savedInstanceState) {
// Inflate the layout for this fragment

     return inflater.inflate(R.layout.fragment_success, container, false);
}
public static LogSuccessFragment newInstance(String str){
    arg=str;
    return(new LogSuccessFragment());
}

public void onStart(){
    super.onStart();
    TextView txtview = (TextView)getActivity().findViewById(R.id.txtsucess_view);
     txtview.setText(arg);
}

}

Valid Login


The MainActivity.java file that acts as the main interface of the Login app is written as shown below. To support older Android versions (lower than 3.0) you need to use the FragmentActivity instead of Activity class. The FragmentActivity and all other fragments used in this app are in Support Library v4. If you got the latest Android SDK installed on your machine, you will have this library automatically in your project. In your project window, you can find this library by expanding or double-clicking the Android Private Libraries.
To add a fragment to the main activity. You need to create the instance of the fragment. Then use the add method of the Transaction object to to add the fragment instance to the main activity. You can get the Transaction object by using the beginTransaction method from the fragment manager. Replacing or removing a fragment also follows this process except you need to change from add to replace or remove method.

package com.example.login;
import android.os.Bundle;
import android.app.Activity;
import android.support.v4.app.FragmentActivity;
import android.support.v4.app.FragmentTransaction;
import android.view.Menu;
import android.view.View;
import android.widget.EditText;
import android.widget.Toast;
public class MainActivity extends FragmentActivity {
@Override
protected void onCreate(Bundle savedInstanceState) {
       super.onCreate(savedInstanceState);
       setContentView(R.layout.activity_main);
       LoginFragment lf=new LoginFragment();
       getSupportFragmentManager().beginTransaction().add(R.id.fragment_container,lf).commit();
}

@Override
public boolean onCreateOptionsMenu(Menu menu) {
// Inflate the menu; this adds items to the action bar if it is present.
getMenuInflater().inflate(R.menu.main, menu);
return true;
}

public void doLogin(View view){
    EditText txtuser=(EditText)findViewById(R.id.txt_user);
   EditText txtpassword=(EditText)findViewById(R.id.txt_pwd);
   String username=getResources().getString(R.string.username);
   String password=getResources().getString(R.string.password);
   if(txtuser.getText().toString().equals(username) && txtpassword.getText().toString().equals(password)){
       String mess="Welcome! You have logined successfully.";
       LogSuccessFragment logf=LogSuccessFragment.newInstance(mess);
       FragmentTransaction transact=getSupportFragmentManager().beginTransaction();
       transact.replace(R.id.fragment_container, logf,"log");
       transact.addToBackStack(null);
       transact.commit();
        }
 else
     Toast.makeText(this, "Invalid login", Toast.LENGTH_SHORT).show();

    }

}

The layout file of the main activity simply contains a FragmentLayout container. This file is called activity_main.xml file.
<?xml version="1.0" encoding="utf-8"?>
<FrameLayout xmlns:android="http://schemas.android.com/apk/res/android"
android:id="@+id/fragment_container"
android:layout_width="match_parent"
android:layout_height="match_parent"
/>

Download apk file of the Login app
compass app flashLight app

Wednesday, September 11, 2013

Ideal Body Weight Calculator

In this post, you learn to create the Ideal Body Weight Calculator (IBWC) app. The app allows the user to specify his/her sex and height. Then the recommended weight of the user is calculated. The Devine formula is used to calculate the IBW for men. This formula is shown below.
Ideal Body Weight =50kg+2.3* (height-60)

Another formula used in Ideal Body Weight Calculator app is Robinson formula. This formula is appropriate for women. So, we use this formula to calculate the IBW for women.
Ideal Body Weight=49kg+1.7*(height-60)

It is noted that these formulas are appropriate for people who are taller than 5 feet or 60 inches.

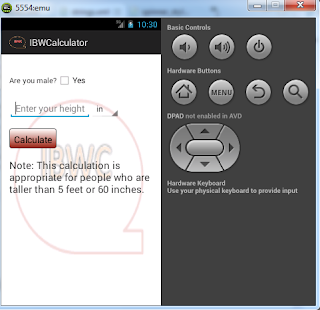
For the user interface, we need two TextView, one CheckBox, one EditText, one Spinner, and one Button. The first TextView displays the question text "Are you male?". Next to this TextView, it is a CheckBox view. The CheckBox displays "Yes" next to the tick mark. The user answers the question by selecting or unselecting the CheckBox. We use this CheckBox to determine the sex of the user.

The EditText view is used to allow height input. This value can be in inch or centimeter. The user can specify the measurement of the height value by choosing in or cm from the Spinner view next to this EditView. The file applies layout to the spinner is called spinner_style.xml. This file locates in res/layout directory. Here is the content of the spinner_style.xml file.

<?xml version="1.0" encoding="utf-8"?>
<CheckedTextView xmlns:android="http://schemas.android.com/apk/res/android"
android:id="@android:id/text1"
style="?android:attr/spinnerDropDownItemStyle"
android:singleLine="true"
android:layout_width="wrap_content"
android:layout_height="wrap_content"
android:ellipsize="marquee" />

The last TextView is used to display a note to the user regarding the limitation of the two formulas.
The Button view displays the text "Calculate". When the Calculate button is pushed, the calculateIBW method is called to perform the calculation. The android:onClick property links the Button view and the calculateIBW method. This method is defined in the MainActivity.java file. The background of the Button view is defined by a drawable resource that is written in the bt_style.xml file. The bt_style.xml file is stored in res/drawable directory. Here is the content of the bt_style.xml file:
<?xml version="1.0" encoding="utf-8"?>
<selector xmlns:android="http://schemas.android.com/apk/res/android">
<item android:state_pressed="true" >
<shape>
<solid
android:color="#ff00ff" />
<stroke
android:width="1dp"
android:color="#171717" />
<corners
android:radius="3dp" />
<padding
android:left="10dp"
android:top="10dp"
android:right="10dp"
android:bottom="10dp" />
</shape>
</item>
<item>
<shape>
<gradient
android:startColor="#ffffff"
android:endColor="#992211"
android:angle="270" />
<stroke
android:width="1dp"
android:color="#171717" />
<corners
android:radius="4dp" />
<padding
android:left="10dp"
android:top="10dp"
android:right="10dp"
android:bottom="10dp" />
</shape>
</item>
</selector>

Ideal Body Weight Calculator Interface


The activity_main.xml file that is the source for IBWC app user interface can be written as shown below:
<LinearLayout xmlns:android="http://schemas.android.com/apk/res/android"
xmlns:tools="http://schemas.android.com/tools"
android:layout_width="match_parent"
android:layout_height="match_parent"
android:paddingBottom="@dimen/activity_vertical_margin"
android:paddingLeft="@dimen/activity_horizontal_margin"
android:paddingRight="@dimen/activity_horizontal_margin"
android:paddingTop="@dimen/activity_vertical_margin"
tools:context=".MainActivity"
android:orientation="vertical"
android:background="@drawable/bgimage">

<LinearLayout
android:layout_marginTop="20dp"
android:layout_width="fill_parent"
android:layout_height="wrap_content"
android:orientation="horizontal" >

<TextView
android:id="@+id/txt_qa"
android:layout_width="wrap_content"
android:layout_height="wrap_content"
android:text="@string/txt_q"
/>
<CheckBox
android:id="@+id/ch_y"
android:layout_width="wrap_content"
android:layout_height="wrap_content"
android:text="@string/ch_y"

/>

</LinearLayout>

<LinearLayout
android:layout_marginTop="20dp"
android:layout_width="fill_parent"
android:layout_height="wrap_content"
android:orientation="horizontal" >

<EditText
android:id="@+id/txt_height"
android:layout_width="wrap_content"
android:layout_height="wrap_content"
android:hint="@string/hint_h"
android:inputType="numberDecimal" />
<Spinner
android:id="@+id/unit_spinner"
android:layout_width="wrap_content"
android:layout_height="wrap_content" />

</LinearLayout>

<LinearLayout
android:layout_marginTop="20dp"
android:layout_width="fill_parent"
android:layout_height="wrap_content"
android:orientation="horizontal" >
<Button
android:id="@+id/bt_calc"
android:background="@drawable/bt_style"
android:text="@string/bt_text"
android:layout_width="wrap_content"
android:layout_height="40dp"
android:layout_marginRight="20sp"
android:onClick="calculateIBW"
/>
<TextView
android:id="@+id/txt_result"
android:layout_width="fill_parent"
android:layout_height="wrap_content"
android:textColor="#992211"
android:textSize="20sp"
/>
</LinearLayout>
<TextView
android:id="@+id/txt_note"
android:layout_width="fill_parent"
android:layout_height="wrap_content"
android:textSize="20sp"
android:layout_marginTop="20sp"
android:text="@string/txt_note"
/>
</LinearLayout>

As you have seen in the picture above, the IBWC app has a background image. You can specify the background image of an Android app by using the android:background property of the top LinearLayout. In this app, the image that is used as the background when the activity is active is called bgimage that is stored in the res/drawable directory.
android:background="@drawable/bgimage"

Some string values used in the activity_main.xml are defined in the string.xmlf file. The content of the strings.xml file is shown below.
<?xml version="1.0" encoding="utf-8"?>
<resources>
<string name="app_name">IBWCalculator</string>
<string name="action_settings">Settings</string>
<string name="txt_q">Are you male?</string>
<string name="ch_y">Yes</string>
<string name="hint_h">Enter your height</string>
<string name="bt_text">Calculate</string>
<string name="txt_note">Note: This calculation is appropriate for people who are taller than 5 feet or 60 inches.</string>

</resources>

The last important file that you have to look and modify is MainActivity.java file. In this file, you need to add some methods such as setUpSpinnerData, getHeight, calculateIBW, and showAlert.

package com.example.ibwcalculator;
import java.text.DecimalFormat;
import java.text.NumberFormat;
import android.os.Bundle;
import android.app.Activity;
import android.app.AlertDialog;
import android.content.DialogInterface;
import android.view.Menu;
import android.view.View;
import android.widget.ArrayAdapter;
import android.widget.CheckBox;
import android.widget.EditText;
import android.widget.Spinner;
import android.widget.TextView;

public class MainActivity extends Activity {

protected void onCreate(Bundle savedInstanceState) {
        super.onCreate(savedInstanceState);
        setContentView(R.layout.activity_main);
    }

    public boolean onCreateOptionsMenu(Menu menu) {
        //Inflate the menu; this adds items to the action bar if it is present.
        getMenuInflater().inflate(R.menu.main, menu);
        return true;
    }
 
    public void onStart(){
    super.onStart();
    setUpSpinnerData(); //populate data in spinner view
       
    }


    //This method will be invoked to setup data of the spinner view
    public void setUpSpinnerData(){
    Spinner sp=(Spinner)findViewById(R.id.unit_spinner);
    String[] items={"in","cm"};
    ArrayAdapter<String> aa=new ArrayAdapter<String>(this,R.layout.spinner_style,items);
    sp.setAdapter(aa);
   
    }
 
  //This method returns the height in inch
    public double getHeight(String strvalue){
    Spinner sp=(Spinner)findViewById(R.id.unit_spinner);    
   
    double value=Double.valueOf(strvalue);
    if(sp.getSelectedItem().toString().equals("cm")){
    return(value/2.54); //1inch=2.54cm
   
    }
    else {
    return(value);
    }
    }


    //This method calculates the IBW  
    public void calculateIBW(View view){
    double ibw=0.0f;
    CheckBox ch=(CheckBox)findViewById(R.id.ch_y);
    EditText txth=(EditText)findViewById(R.id.txt_height);
    String strvalue=txth.getText().toString();
    if(strvalue.length()>0){
    double height=getHeight(strvalue);    
    if(ch.isChecked()) //calculate ideal body weight for men
    ibw=50+2.3*(height-60);
    else //calculate ideal body weight for women
    ibw=49+1.7*(height-60);
    //create decimal formatter object to format the result
    NumberFormat nf=new DecimalFormat("###.00");    
    //display the result in txt_result
    TextView txtresult=(TextView)findViewById(R.id.txt_result);    
    txtresult.setText("IBW="+nf.format(ibw)+"kg");
   
    }
   
    else{
    showAlert();
    }
    }
 
 
     //This method will be invoked to display alert dialog
     public void showAlert(){
   
    AlertDialog.Builder builder = new AlertDialog.Builder(this);
         builder.setMessage("Please enter your height!");
         builder.setCancelable(true);
         builder.setPositiveButton("OK", new OkOnClickListener());
         AlertDialog dialog = builder.create();
         dialog.show();
   
     }
     private final class OkOnClickListener implements
     DialogInterface.OnClickListener {
      public void onClick(DialogInterface dialog, int which) {
      dialog.dismiss();
      }
     }

 
}


The setupSpinnerData is invoked when the app starts to populate entries of the spinner. These entries are in and cm. You specify the entries of the spinner in the ArrayAdapter object then set this object to the Spinner view by using its setAdapter method. When you create ArrayAdapter object from the ArrayAdapter class, you need to provides three values to constructor of the ArrayAdapter class. The first value is the context. You can use this for this value to refer to the current activity. The second value is the layout of the Spinner view. This layout is defined in the spinner_style.xml file as mentioned above. The last value is the array that contains entries of the spinner.
The getHeight method returns the height input in inch. This value will be used in the calculateIBW method to calculate the ideal body weight for the user.
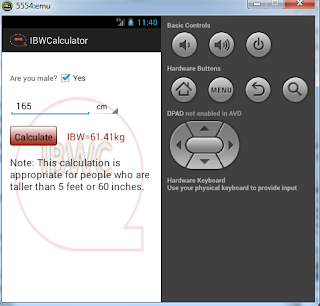
The calculateIBW is invoked when the user pushed the Calculate button. This method calculate the ideal body weight of the user based on his/her sex. If the user is male (CheckBox is selected), the Davine formula is used. Otherwise, the Robinson formula is used.
The showAlert method is invoked to display a dialog to ask the user to enter his/her height in the EditText, txt_height. This alert dialog is displayed only when the user leaves the EditText, txt_height blank and pushes the Calculate button. In Android, the alert dialog box can be created by using the Builder class. This class is a sub-class of the AlertDialog class.

Testing ideal weight calculator

Download apk file of the Ideal Body Weight Calculator app Merge or Combine PDF, Txt, Images

Monday, September 9, 2013

Temperature Converter

In this post, you will learn to create a simple app to convert a temperature in Celsius to Fahrenheit and vise versa. Now you need to open Eclipse program and create a new project and name it as CtoFConverter. If you don't know how to create a project in Elipse, please read this guide Helloworld app.
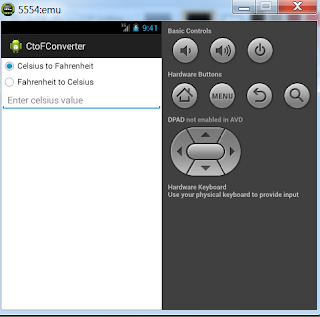
For the app interface, we need two radiobuttons, one textbox, and one textview. See the picture below.


temperature converter


After creating the CtoFConverter project, please open the activity_main.xml file (in res/layout directory). This file is the source that defines views to be placed on the main activity. Views in Android can be said as components or controls in Java or C#. You need to modify the activity_main.xml file to include the two RadioButtons, one EditText, and one TextView views. So the activity_main.xml file is as shown below.

<?xml version="1.0" encoding="utf-8"?>
<LinearLayout  xmlns:android="http://schemas.android.com/apk/res/android"
  android:layout_width="fill_parent"
android:layout_height="fill_parent"
android:orientation="vertical">
   >
<RadioGroup
android:layout_width="fill_parent"
android:layout_height="wrap_content"
android:orientation="vertical">
<RadioButton android:id="@+id/ctof_radio"
android:layout_width="wrap_content"
android:layout_height="wrap_content"
android:text="@string/ctof_radio"
android:onClick="onRadioButtonClicked"
android:checked="true"
/>
<RadioButton android:id="@+id/ftoc_radio"
android:layout_width="wrap_content"
android:layout_height="wrap_content"
android:text="@string/ftoc_radio"
android:onClick="onRadioButtonClicked"/>
</RadioGroup>

<EditText
    android:id="@+id/txt_input"
    android:layout_width="fill_parent"
    android:layout_height="wrap_content"
    android:hint="@string/hint_ctof"
    android:inputType="numberDecimal" />

<TextView
    android:id="@+id/txt_result"
    android:layout_width="fill_parent"
    android:layout_height="wrap_content"
    android:textColor="#992211"
    android:textSize="20sp"
/>
</LinearLayout>

The two RadioButtons are placed in the RadioGroup so that only one of them can be selected at a time. The first RadioButton is for Celsius to Fahrenheit conversion. In contrast, the second RadioButton is for Fahrenheit to Celsius conversion.
To define id property for each view, we use android:id property. The @ symbol tells the compiler to read text after the forward slash (/). By using the plus sign (+) before the id, you want to tell the compiler that this id is new and needs to be created. The width and height of a view can be defined by using android:layout_width and android:layout_height respectively. The wrap_content value of these properties specifies that the view wraps its content. The fill_parent value allows the view to be expanded to fit the screen. Besides, wrap_content and fill_parent, you can specify the width and height of the values in dp or sp unit.
To assign text to each RadioButton or other views that support text property, you need to use the android:text property. For the first RadioButton the value of the text property is taken from the string resource called ctof_radio. This string and other strings that are used for this interface construction are defined in strings.xml file (in res/values directory). You need to place @string before the name of the string to indicate that this string is defined in the strings.xml resource file.

This is the content of the strings.xml file used in this app:
<?xml version="1.0" encoding="utf-8"?>

<resources>

    <string name="app_name">CtoFConverter</string>
    <string name="action_settings">Settings</string>
    <string name="ctof_radio">Celsius to Fahrenheit</string>
    <string name="ftoc_radio">Fahrenheit to Celsius</string>
    <string name="hint_ctof">Enter celsius value</string>
    <string name="hint_ftoc">Enter fahrenheit value</string>

</resources>

The EditText view is a textbox that allows the user to type a number in Celsius or Fahrenheit. The inputType property specifies the input type of the textbox. The value of the input type can be one of the followings:
-number allows integer number input.
-numberDecimal allows floating-point number input.
-textPassword allows text input. The original text is kept. However, the password symbols are displayed instead of the actual characters.
-textMultiLine allows the text to expand to multiple lines.
-textCapWords displays a capital character at the beginning of each word.
-textCapSentences displays a capital character at the beginning of each sentence.
-date allows a value in date format input.
-time allows a value in time format input.
-datetime allows a combination of date and time input.

The last view that we use is TextView. The TextView view is used to display the result of the conversion. When the user types a value in the EditText view, the calculation is made to produce a result. The result is displayed in the TextView view.
The result can be a value in Celsius or Fahrenheit according to the RadioButtons selection. If the first RadioButton is selected, the user is prompted to enter a value in Celsius so that the conversion is from Celsius to Fahrenheit and the result is in Fahrenheit. Otherwise, the conversion is from Fahrenheit to Celsius so that the result is in Celsius.

All views are placed inside the LinearLayout. You can treat the LinearLayout in Andoid as a layout manager in Java. It is used to layout components in the app interface. The LinearLayout arranges the views in one orientation-vertical or horizontal. You can use its android:orientation property to specify vertical or horizontal orientation.

Receive click event from RadioButton

To perform an action when the RadioButton is clicked, you need to register to the click event to the RadioButton view by using its android:onClick property. The value of this property will be a method to perform the action. In this app, the method to perform the action when the RadioButon is clicked is onRadioButtonClicked. This method is defined in the MainActivity.java file. When the first RadioButton is selected, the hint text of the EditText changes to Enter Celsius value. If the second RadioButton is selected, the the hint text of the EditText changes to Enter Fahrenheit value.

MainActivity.java file
package com.example.ctofconverter;
import android.os.Bundle;
import android.app.Activity;
import android.text.Editable;
import android.text.TextWatcher;
import android.view.Menu;
import android.view.View;
import android.widget.EditText;
import android.widget.RadioButton;
import android.widget.TextView;

public class MainActivity extends Activity {

    private String strFrom="Celsius";
    private String strTo="Fahrenheit";
    protected void onCreate(Bundle savedInstanceState) {
        super.onCreate(savedInstanceState);
        setContentView(R.layout.activity_main);
    }


    public boolean onCreateOptionsMenu(Menu menu) {
        // Inflate the menu; this adds items to the action bar if it is present.
        getMenuInflater().inflate(R.menu.main, menu);
        return true;
    }
 
    public void onStart(){
    super.onStart();
    EditText et=(EditText)findViewById(R.id.txt_input); //refer tot he EditText, txt_input
    et.addTextChangedListener(new ChangeListener()); //register the view with the text change listener
    et.setHint("Enter celsius value");
    }
 
    class ChangeListener implements TextWatcher{
   
    public void beforeTextChanged(CharSequence s, int start, int before, int count){
   
   
    }
   
    public void onTextChanged(CharSequence s, int start, int before, int count){
   
    convert(strFrom,strTo);  //do conversions  
    }
   
    public void afterTextChanged(Editable ed){
   
   
    }
    }
 
    public void convert(String from, String to){
    EditText et=(EditText) findViewById(R.id.txt_input);
    TextView tv=(TextView) findViewById(R.id.txt_result);
    double cvalue=0.0;
double fvalue=0.0;
    if(et.getText().toString().length()>0){
    if(from.equals("Celsius")) //convert from Celsius to Fahrenheit
    {
    cvalue=Double.parseDouble(et.getText().toString());
    fvalue=32+(cvalue*180.0/100.0);
    tv.setText(fvalue+to);
    }
    else{ //convert from Fahrenheit to Celsus
    fvalue=Double.parseDouble(et.getText().toString());
    cvalue=(fvalue-32)*100.0/180.0;
    tv.setText(cvalue+to);
    }
   
    }
   
    }
 
    public void onRadioButtonClicked(View view) {
    boolean checked = ((RadioButton) view).isChecked();
    EditText et=(EditText)findViewById(R.id.txt_input);

    switch(view.getId()) {
    case R.id.ctof_radio:
    if (checked){ //the first RadioButton is selected
    strFrom="Celsius";
    strTo="Fahrenheit";
    et.setHint("Enter celsius value");    
   
    }
    break;
    case R.id.ftoc_radio:
    if (checked){ //the second RadioButton is selected
    strFrom="Fahrenheit";
    strTo="Celsius";
    et.setHint("Enter fahrenheit value");
   
}
    break;
    }
    }
 
}

Refer a view in code

When you place views in the activity_main.xml file, the id of each view is recorded in the R.java file (in gen directory). When writing code for the main activity or other activities, referring to the views allows you to use the views. You can refer a view by using the findViewById(R.id.id_of_the_veiw) of the Activity class. For example, to refer the EditText, txt_input can be done by this line of code:

EditText et=(EditText)findViewById(R.id.txt_input);

Receive text change event

When the user types a value in the EditText, txt_input. This value immediately is calculated to produce a result. Then the result is displayed in the TextView, txt_result. The actions that convert and display the result happen when the user is making change to the value of EditText, txt_input. To perform an action when the text of EditText view is making changed, you need to register this view with the text change listener  by using the addTextChangedListener(TextWatcher tw) method. You will need a class to implement the TextWatcher interface. Then create an object of this class and supply it to the addTextChangedListener method. In this app, this class is called ChangeListener. You must implement all methods of the TextWatcher interface. These methods are beforeTextChanged, onTextChanged, and afterTextChanged.

doing temperature conversion when text change

compass app flashLight app

Do conversions

To convert a value input in the EditText, txt_input, to produce a result, the convert (String from, String to) is defined in the MainActivity.java file. This method will be placed in the onTextChanged method of ChangeListener class.
The conversion from Fahrenheit to Celsius value can be performed by using the formula below:
Celsius=(Fahrenheit-32)*100.0/180.0;
To convert from Fahrenheit to Celsius value, you can use the formula below:
Fahrenheit=32+(Celsius*180.0/100.0);

Merge or Combine PDF, Txt, Images

Saturday, September 7, 2013

Hello World app

After installing necessary tools for Android development, this post provides you step by step guide to create your first app for Android mobile devices.

1. Go to the folder where you put your Android SDK. In the eclipse directory, double-click the eclipse.exe file to launch the eclipse program.

app workspace


2. When the Workspace Laucher opens, enter or select a directory that will be the workspace for your app. Then wait one or two seconds for eclipse to prepare the workspace for you.
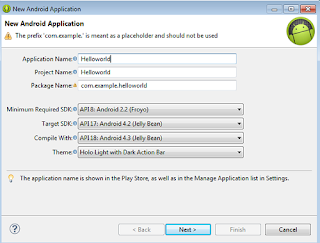
3. To create your new app, select the File->New->Android Application Project to open the  New Android Application window. In the Application Name textbox, enter your app name. For this first app, just enter Helloworld for this textbox.

new app creation


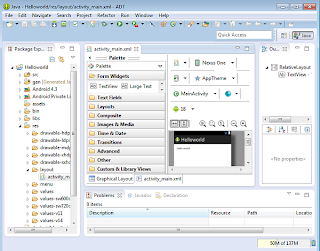
Then click Next until you see the Finish button. Click the Finish button to complete the app creation task. The below screen displays after you click the Finish button.

app is created


Run Helloworld app

To run the Helloworld app, firstly you will need to create a emulator. Your app will run on this emulator. The steps below help you to create an emulator to run your app.
1. On the Window menu, select Android Visual Device Manager. On the Android Visual Device Manger window, click New... to create a new emulator.
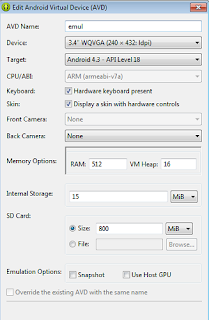
2. In the AVD Name textbox, enter the name of the emulator. For the Device drop down list select a device for the emulator. See the picture below.

creating emulator


3. After filling the form, click OK to create the emulator.

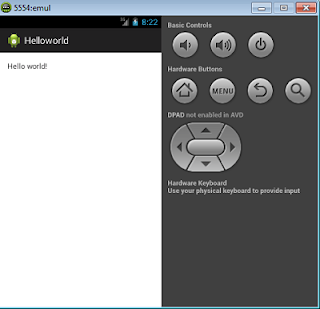
Now you have a simulator setup. To run the Helloworld app, select Run->Run Configuration... to open the Run Configuration window. On this window, double-click Android Application. In the Project textbox, type Helloworld and under Launch Option, select Launch. From the Launch drop down list select com.example.helloworld.MainActivity. Then click Run to run the app. You will wait until the emulator displays the result as shown in the picture below. This generally takes two to fives minutes for the first run. When the result is shown, don't close the emulator. For the next run, it will be faster.

run app


When the app created, some directories and files are created in your app workspace directory. These directories and files are anatomy of the Android app. The important directories and files are shown below:
1. bin directory contains the binary .class files and .apk file of your app (helloworld.apk). This apk file can be installed on the mobile devices.
2. gen directory contains .R file that references all resources found in your app.
3. res/drawable directory contain drawable resources such as images, shapes defined in xml file format for extra high, high, medium, and low screen resolution.
4. res/layout directory contains xml files that are used as layouts of your app interfaces.
5. res/menu directory contains a xml file that defines menu and its items in your app.
6. res/values contains xml files that define the default screen margins, string values, and styles to be used in your app.
7. src and its sub-directories contains the java source files of your app.
8. AndroidManifest.xml file defines the characteristics of your app such as app version, minimum and target SDK versions, activities, etc.

MainActivity.java file

The MainActivity.java file is the starting point of your app. In this file, MainActivity class extends the Activity class.
package com.example.helloworld;
import android.os.Bundle;
import android.app.Activity;
import android.view.Menu;

public class MainActivity extends Activity {

    @Override
    protected void onCreate(Bundle savedInstanceState) {
        super.onCreate(savedInstanceState);
        setContentView(R.layout.activity_main);
    }


    @Override
    public boolean onCreateOptionsMenu(Menu menu) {
        // Inflate the menu; this adds items to the action bar if it is present.
        getMenuInflater().inflate(R.menu.main, menu);
        return true;
    }
 
}

The Activity class has the following methods that you should know:

1. onCreate method is invoked to create interface for the main activity. The activity_main.xml file is the source for the app interface. Components that will be parts of the interface are define here. You can find the activity_main.xml file in res/layout directory.

activity_main.xml file
<RelativeLayout xmlns:android="http://schemas.android.com/apk/res/android"
    xmlns:tools="http://schemas.android.com/tools"
    android:layout_width="match_parent"
    android:layout_height="match_parent"
    android:paddingBottom="@dimen/activity_vertical_margin"
    android:paddingLeft="@dimen/activity_horizontal_margin"
    android:paddingRight="@dimen/activity_horizontal_margin"
    android:paddingTop="@dimen/activity_vertical_margin"
    tools:context=".MainActivity" >

    <TextView
        android:layout_width="wrap_content"
        android:layout_height="wrap_content"
        android:text="@string/hello_world" />

</RelativeLayout>

2. onStart method is immediately invoked after the onCreate method to start the activity. However, the user still can't interact with the app interface.
3. onResume method is invoked after the onStart method to bring the interface to the front so that the user can interact with the app interface.
4. onPause method works when an activity is obscured by another activity. When the activity in the pause state, it does not receive input or execute any code.
5. onStop method is invoked when the user leaves the activity. This method always called after the onPause method is called. When the activity is in stop state, app interface is invisible and the focus is on a separate activity.
5. onRestart method is invoked when the user returns to the previously stopped activity. The methods that are invoked immediately after the onRestart methods are onStart, and onResume.
6. onDestroy method is invoked when the system dispatches a final signal of clearing the app from the memory. In this method, you should close the connection to the database, or long-run processes that can leak your memory.

strings.xml file

In the strings.xml file (in res/values directory) string resources are defined. A string entry has two parts--name and value. For example, the first string entry name is app_name and its values is Helloworld.

<?xml version="1.0" encoding="utf-8"?>

<resources>

    <string name="app_name">Helloworld</string>
    <string name="action_settings">Settings</string>
    <string name="hello_world">Hello world!</string>

</resources>

The strings defined in the strings.xml file can be used in other layouts xml files.
For example, the string hello_world is used as the text of the TextView component in the activity_main.xml file: android:text="@string/hello_world".

Friday, September 6, 2013

Get start with Android apps development

Android is an open source operating system based on Linux kernel. It is found in millions of mobile devices such as Galaxy smart phones and tablets.
Android provides tools and libraries so that you can develop apps in mobile environment fast and easy. For example, Android SDK is a crucial tool that most Android developers use to write, debug, compile, and run the Android apps. Furthermore, this tool provides SDK download manager that allows you to download useful libraries, samples and more from the web. Android allows the developers to use a rich set of libraries such as libraries for creating apps interface, accessing files and databases, communicating with other devices and accessing the network resources, etc.
Android logo

The fundamental programming language used in Android apps development is Java. Therefore, programmers that have previous experience with Java programming language can learn apps development faster than people who are new to Java. If you are new to Java, you can check this tutorial to learn the basic things about Java. If you want to look for free Java programs source code, please check this java programs blog.

What will you need?

I am a Window user so i will talk about developing Android apps in Windows operating systems. Firstly you will have Java SE installed in your computer. You can visit its official website to download the file. If you already have the Java SE installed, skip this step and move to download Android SDK. To develop apps for Android in Window operating systems, you need to download the Android SDK from its official Android website. This website allows you to download Android SDK for 32-bit or 64-bit Window platform. The download package is a zip file that contains every things that you need to develop Android apps. Then  extract the all files and directories in the zip file to place in a directory that you like.

android tool placed in directory

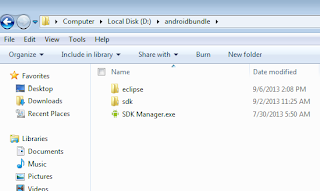
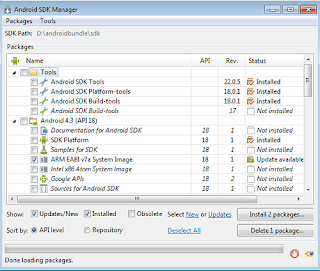
In the directory that you placed the contents of the zip file, you will see three items as shown in the image above. The eclipse directory contains eclipse.exe file that you can double-click to open the eclipse program. You will create your Android projects with this program. The sdk directory contains samples, source code, and tools for Android development. The last item is a file called SDK manager.exe. It is used to open the Android SDK manager to download samples, source code, and tools for your projects.
In Windows, some people face a problem in launching the Android SDK manager. I faced too.
I spent more than an hour to solve this problem. If you have the same problem, the steps bellow can save your time:
1. Open the android.bat file in sdk directory

2. Look for this code:
rem Check we have a valid Java.exe in the path.
set java_exe=
call lib\find_java.bat
if not defined java_exe goto :EOF

3. Replace this code with the code below:
rem Check we have a valid Java.exe in the path.
set java_exe=C:\Windows\System32\java.exe
rem call lib\find_java.bat
if not defined java_exe goto :EOF

4 Look for this code:
rem Set SWT.Jar path based on current architecture (x86 or x86_64)
for /f %%a in ('%java_exe% -jar lib\archquery.jar') do set swt_path=lib\%%a

5. Replace this code with the code below:
rem Set SWT.Jar path based on current architecture (x86 or x86_64)
rem for /f %%a in ('%java_exe% -jar lib\archquery.jar') do set swt_path=lib\x86
set swt_path=lib\x86
If your Window is 64-bit, please change x86 to x86_64.

6. Finally, run the android.bat and SDK Manager again.

SDK Manager


Now every thing is fine. You can start developing apps for Android mobile devices.
If you have any problem, you are encouraged to leave comments. I will reply as soon as possible.

Thank you for reading this post.

Merge or Combine PDF, Txt, Images